Coordinators are users from third-party disposal companies designated to review jobs. When a job is created at a location where they serve as a coordinator, they are automatically added as a follower upon activation, giving them immediate visibility into the process. Here's how you can set up users and locations in your account.
Accessing IronSight
Setting up users as Coordinators
Update and archive users
Add new disposal locations
Setting up your Account
System Requirements
Desktops/Laptops:
We support Windows and Mac devices with a current version of Google Chrome or Edge with at least 8 GB of RAM.
Mobile Devices:
- Android - requires an operating system of 6.0 and up.
- iOS - requires an operating system of 14.0 or later.
Note: Even if your device meets these requirements, we have seen issues with some older device models. We recommend devices that are on current OS versions and are no older than 3 years.
Accessing IronSight
You will receive a welcome email from IronSight with a link to create your password after your user have been created in the system.
After creating your password, follow the link in the 'welcome' email to access IronSight's web app & log in.
Adding users
To manage your users and locations, access the Admin Portal as below:
Click on Account and select Admin Portal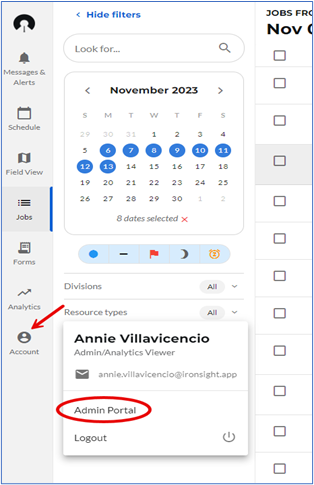
If preferred, you can access the admin portal from your phone at this link
How to manage Users in your Organization
Users in your organization are the coordinators responsible for reviewing and approving the jobs, please set up all your users as Admins and add an Attribute to ensure the association with the locations they are managing. These attributes will also need to be added as tags to the disposal location they are managing. Click here to see how to do that.
Add new users
Visit the Users tab and click on New.

a. Enter a Name
b. Enter an Email address. Important note: This email address will receive an email notification when setting up/updating their password.
c. Enter Phone number. Optional
d. Assign the Admin Role to the user, the first 3 toggles will turn on automatically.
e. Add the Attribute by clicking on Add, then:
- If you would like the user to see all jobs: , enter "Area-Coordinator" as the newKey and "All" in the field next to it. Then click on Save.
- If you would like the user to only see jobs for certain disposal locations, enter "Area-Coordinator" as the newKey and their name exactly as it appears in the "name" field under their user profile (example "Annie V") in the field next to it. Then click on Save.
f. The user will receive a ‘Welcome to IronSight’ email that will have them set their password.


Update and archive users
IronSight also allows you to update information and/or remove the user's access to the platform when needed.
Visit the Users tab and click on the name of the user you would like to update or remove

Update the information and click Save, or Click on Archive and then Ok.


If the user needs to be "unarchived". Click on Archived, then click on the name of the user you would like to unarchive
 Review information and update if applicable, click unarchive.

How to manage Locations in your Organization
When creating a new location or updating an existing one, please make sure to add all required information and the corresponding "Tags": County, State, PermitNo and Area.
Add new locations
Visit the Locations tab and click on New.

a. Enter the location name.
b. Specify the location type.
c. Select the current status (optional).
d. Which hubs do you use this location with, this dropdown allows you to select the clients who will have visibility of this location.
e. Provide a description if needed (optional).
f. Input the geographic coordinates—latitude and longitude.
g. Add 4 required "tags":
- Tags categories will be:
- "County" and "State" where this location is located,
- "PermitNo" following the same format written above, capital P and N, no space between words, and
- "Area-Coordinator" this tag needs to match the Area Attribute you utilized when creating the user. These Area-Coordinator tags will allow you to associate the locations with your coordinators. Example: if I added the Attribute "Area-Coordinator" and "John Smith" to John Smith, I would add the tag Area-Coordinator: John Smith to all the locations he is responsible for reviewing and approving jobs.
h. Click "Save" to finalize the new location.
