Welcome to QBO
Here’s our step by step setup guide to get started!
Setup Instructions
We have 4 easy steps to get rolling with your Quickbooks Online integration!
- Connect with Quickbooks
Setup requires a user with Ironsight Admin permissions and Quickbooks Online Admin permissions
- Navigate to Admin Portal > Apps Page
- Click on the Quickbooks Online App
- Follow steps to connect your Quickbooks account to IronSight

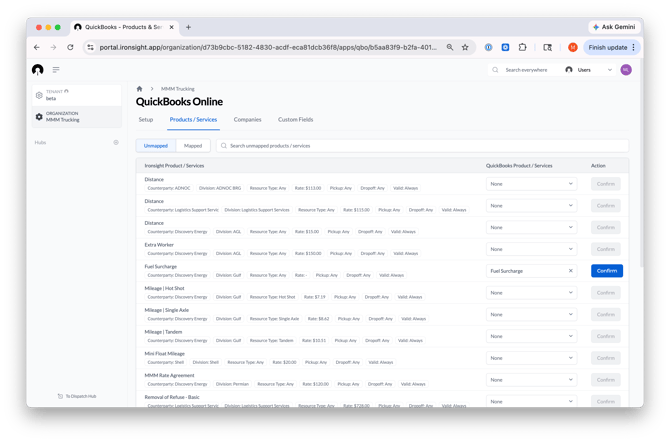
Great, you’ve connected your Quickbooks account and are ready to get started with the next few steps! Next you will need to map your IronSight Products/Services to Quickbooks Product/Services. Mapping is how you tell IronSight how your data should appear in QuickBooks — for example, which IronSight Product and Service lines correspond to which QuickBooks products. This also allows us to create invoices with appropriate taxes.
-
- Navigate to Admin Portal > Apps Page > Quickbooks Online > Click on the Product/Services tab
- For every IronSight Product/Services, find in the dropdown the equivalent in Quickbooks Product/Services
- Confirm the mapping and the row will move into the Mapped Product/Services.
- If you would like to change your mind on the mapping, navigate to the Mapped tab, and you can select Unmap to remove the mapping.
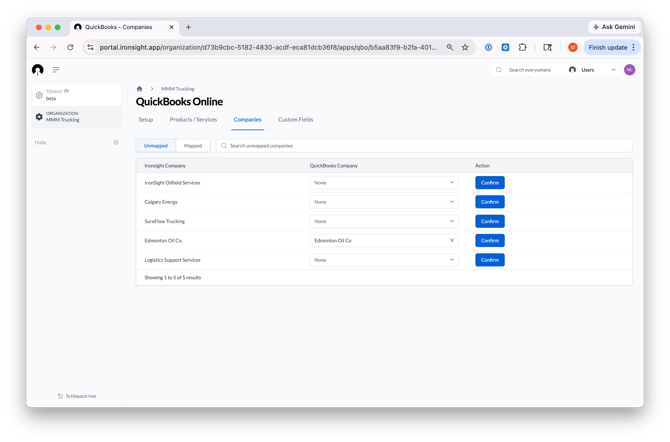
Next, you will need to map your IronSight Companies to Quickbooks Companies - for example, multiple companies need to be billed under one. This allows us to create invoices using QBO’s Companies information (such as billing addresses and taxes).
-
- Navigate to Admin Portal > Apps Page > Quickbooks Online > Click on the Companies tab
- For every IronSight Company, find in the dropdown the equivalent in Quickbooks Company
- Confirm the mapping and the row will move into the Mapped Product/Services.
- If you would like to change your mind on the mapping, navigate to the Mapped tab, and you can select Unmap to remove the mapping.
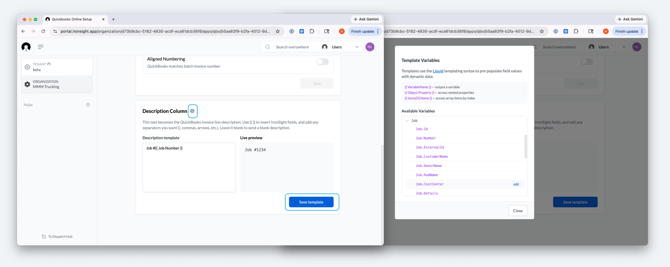
Choose what appears on your invoices. You can customize two areas: the description column for each line item, and your invoice header fields.
Description Column
The description column is the line item description that appears on each invoice line in QuickBooks. You can customize what information shows up there by pulling in IronSight data automatically.
-
- Go to Admin Portal → Apps → QuickBooks Online → Setup
- Scroll down to the Description Column section
- Click the ⓘ icon to open the list of available IronSight fields — you can pull in information at the batch level (like invoice date or owner name) or at the job and line item level (like job number or service description). Click Add next to the fields you want to include
- A live preview will show you exactly how the description will appear on your invoice before you save
- Click Save Template when you're happy with it
- To confirm it's working, add a job to a batch and sync it to QuickBooks — the column on your invoice will automatically populate with the job information and template you created
Custom Fields
Custom fields let you map IronSight data to your QuickBooks invoice headers — for example, pulling in a lease name or AFE number automatically when a batch syncs.
- Go to Admin Portal → Apps → QuickBooks Online → Custom Fields
- Under the field dropdown, select a custom field already configured in your QBO account, or choose Add a New Custom Field to create one specific to IronSight (note: custom fields created here will appear on the invoice but may not sync to QBO invoice headers)
- Expand the field using (▾) to configure it — you can mark it as required, set a default value, or enable Template mode
- With Template enabled, click the ⓘ icon to select a dynamic value — this is what IronSight will automatically populate from the batch when the invoice is created in QuickBooks
- A list of available IronSight fields will appear — select the one you want to automatically fill in on your invoice. For example, you could pull in the hub name, job number, or cost center associated with the jobs in your batch. Click Add to add it to the field
- Click Save
- To confirm it's working, add a job to a batch and sync it to QuickBooks — the field on your invoice will automatically populate with the job information you selecte
Syncing to Quickbooks
Create your first batch and sync to Quickbooks
- To create a new batch, navigate to the Jobs page and select the jobs you'd like to batch together on an invoice.
- Select Update, then Add to Batch.
- Create a new batch or add these jobs to an existing one.
- Once your jobs are in a batch and ready to invoice, click Sync on the QuickBooks Online card.
- If synced successfully, select the Open Invoice link to view the invoice in QuickBooks Online.
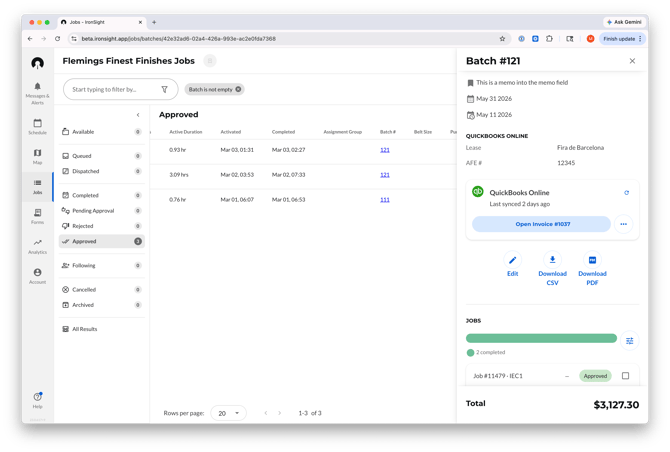
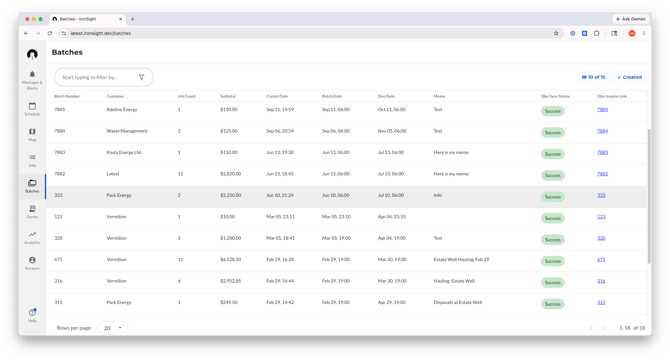
Your Batches Page
The Batches page is your central view for all created batches. See batch names, customers, job counts, subtotals, and invoice dates in one place — and track sync status at a glance. Filter by customer or creator to quickly find what you're looking for.
Frequently Asked Questions
Can you tell me what information you can/cannot access when I connect IronSight with Quickbooks Online?
By connecting IronSight to QuickBooks, you authorize IronSight to read product/service names, customer names and invoice headers from your QuickBooks account — this is how you tell IronSight how your data should appear in QuickBooks, such as which IronSight service lines correspond to which QuickBooks products. When you sync a batch, IronSight will create a draft invoice in QuickBooks on your behalf, including line items, quantities, and descriptions, invoice headers. The resulting invoice ID is then pulled back into IronSight so you can reference it directly from your batch.
I’d like to get form data onto my invoice?
Merina to add to this section
Can multiple users sync invoices to QuickBooks Online?
Yes. While the QuickBooks Online integration is initially set up using admin credentials, it's designed to support billing teams working collaboratively.
Any IronSight user who has been granted access to both IronSight and your connected QuickBooks Online account can sync invoices — no additional configuration required. When a sync is performed, the system automatically logs the user ID of the person who initiated it, giving your team a clear audit trail of who sent what and when.
This means your billing team can divide and conquer without sharing credentials or routing everything through a single admin.
Common Sync Errors
Here are the common warnings or errors you might encounter when syncing with Quickbooks Online.
Warnings:
Products/Services Not Found in QuickbooksWarning Message: 2 items converted to "Services" - Not found in QuickBooks Products and Services list. Add to QuickBooks or map service in Admin Portal for accurate income tracking.
Errors (eg. cannot sync/create QB invoice)
Accounting Period Closed
Error Message: The invoice dated [invoice date] cannot be synced to QuickBooks because that accounting period has been closed. Update invoice date and resync.
Job #[12345] cannot be synced to QuickBooks because it has no line items. QuickBooks requires at least one line item to create an invoice.
Batch cannot be synced because the customer "XYZ" does not exist in your QuickBooks customer list. Create customer in Quickbooks or map this customer in Admin Portal and resync the batch.