Table of Contents
Setting up your Account
Training your Field Team
Create your First Job
Add Locations
Review and Billing
Add Line Items/Products & Services
Setting up your account
System Requirements
Desktops/Laptops:
We support Windows and Mac devices with a current version of Google Chrome or Edge with at least 8 GB of RAM.
Mobile Devices:
- Android - requires an operating system of 6.0 and up.
- iOS - requires an operating system of 14.0 or later.
Note: Even if your device meets these requirements, we have seen issues with some older device models. We recommend devices that are on current OS versions and are no older than 3 years.
Accessing the Admin Portal
After creating your password, follow the link in the 'welcome' email to access IronSight's web app & log in.
If your account has 'Admin' permissions, you can access the Admin Portal as below:
Click on Account and select Admin Portal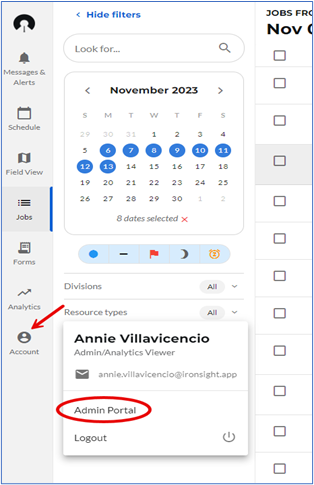
If preferred, you can access the admin portal from your phone at this link
How to manage Users in your Organization *Required
Users in your organization are the people you need to run the daily operations, for example, dispatchers, admins and your field team.
**Don't forget to add your resources with the Execute Work capability as well, without those, you cannot receive work.
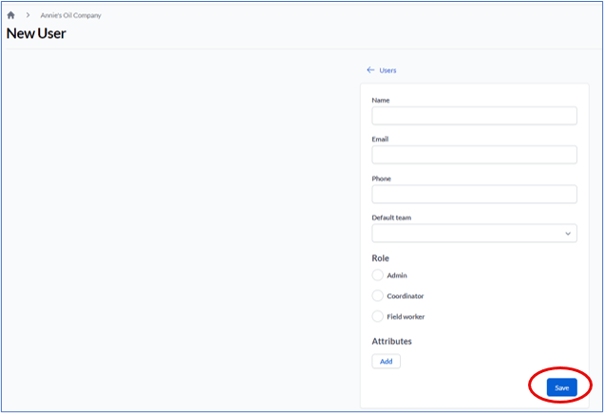
Add new users
Visit the Users tab and click on New.

a. Enter a Name
b. Enter an Email address. Important note: This email address will receive an email notification when setting up/updating their password.
c. Enter Phone number. Optional
d. Enter Default team. Optional
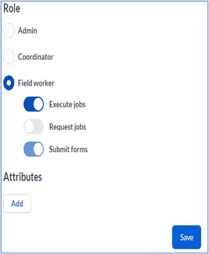
e. Assign a Role to the user. please select all permissions you would like to set up for this user.
f. You can also add Attributes by clicking on Add, and click on Save.
g. The user will receive a ‘Welcome to IronSight’ email that will have them set their password.
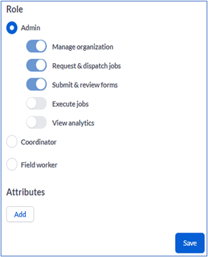
More about Roles:
3 key roles are:
Admin – can do everything including manage users/resources in the Admin Portal.
-
Can see rates on Jobs
-
Can Complete work as a 'field worker', if the ‘Execute Work’ Toggle is on for them.
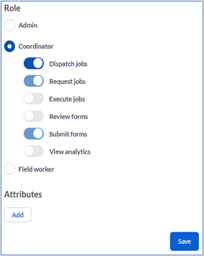
Coordinator – Key limitation: cannot manage users/resources or anything accessed in the admin portal.
- Can assign jobs to your own team
- Can review form submissions
- Can see and add rates on jobs
- Can also complete work if the ‘Execute Work’ Toggle is on.
Field Worker – Limitations: can only see jobs assigned to a resource OR jobs assigned to a resource AND their user account (if dispatching using both fields). Cannot see jobs assigned to other field workers, cannot see rates on line items, can only see their own form responses, cannot be added as a follower to jobs. Cannot access Map view on desktop.
- Can complete work if execute work toggle is on
- Can request their own jobs if 'request' toggle is on
- The requester toggle also allows them to be added as a follower, so they can see other jobs that aren't assigned to them.
Archiving & Unarchiving Users
Ironsight also allows you to update information and/or remove the user's access to the platform when needed.
Visit the Users tab and click on the name of the user you would like to update or remove

Update the information and click Save, or Click on Archive and then Ok.


If the user needs to be "unarchived". Click on the Archived tab, then click on the name of the user you would like to Unarchive. They will now be available to assign Jobs.


How to manage Resources in your Organization *Required
Resources are your units, crews or individuals who complete jobs for your organization
Important Note: To be able to create resources for your company, you are required to have created at least one client.
Each company needs resources created in addition to receive jobs.
If your clients are onboarding you to IronSight please confirm the "type" of resources they would like you to select as the Resource Type will need to match on both sides.
**Don't forget to add your users with the Execute Work capability as well, without those, you cannot receive work.
Add new resources
Visit the Resources tab and click on New.

a. Enter the Name. For example: Unit #44
b. Enter a Description
c. Enter Ticker text.
d. Select Resource type from dropdown.
e. Select Division from dropdown.
f. Turn on the Status online and click Save.

How to manage Details in your Organization * Recommended
The detail tab contains the company contact information.
Add / Manage details
Visit the details tab.
a. Review Company name
b. Review Short name
c. Add or change Primary contact - email address (Optional)
d. Add or change Billing address (Optional), and
e. Click Save

How to manage Products/Services in your Organization
Products and services allow you to add additional charges and rates to a job for sign off and invoicing purposes.
After creating your Products/Services or line items in the Admin Portal, you will be able to select them on a job in Dispatch Hub or mobile. IronSight allows Products/Services to be created individually or to be exported to CSV and imported from CSV. This allows easy bulk updates and the synchronization of products/services with price books from 3rd party applications (killing the app/force stopping and reopening will be necessary to see the new configuration).
- Add new Products and Services
Visit the Products/service tab and click on New to add a single line item.
a. Enter the Name of the frequently used cost.
b. Select the Type that matches best from the dropdown options.
c. Enter a Default Rate for that item – or leave it at $0 if no default applies.
d. Under Price Book, you can select the name of a Hub (Client) you are partnered the charge to. By associating to a Hub’s Price Book both parties can modify the product/service, you and the Energy Producer.
e. You can also add an association with resource types.
f. Select unit of measure. (Optional)
g. You can define start and end dates for when the rate is valid. This is useful for managing seasonal rates or time-limited agreements.
h. Add a description. (Optional)
i. and click Save.

You can also choose to Import the products/ services. To follow this process, you can click on "Export" to download the CVS sample to start with and follow the format.

Products/Services CSV Format
|
Field |
Format |
Column Required |
Rules |
Max. # of characters |
|---|---|---|---|---|
|
Name |
string |
Yes |
|
255 |
|
Type |
string |
Yes |
|
128 |
|
Rate |
decimal |
Yes |
Must be a number ≥ 0 |
Up to 5 digits after the decimal |
|
Description |
string |
No |
|
65,535 |
|
Unit Of Measure |
string |
No |
|
128 |
|
SyncKey |
string |
Yes |
SyncKey must be unique per organization |
255 |
|
PriceBook* |
string |
No |
The name of a Hub you are partnered to. By associating to a Hub’s Price Book both parties can modify the product/service. Price Book cannot be changed for an existing product/service, only set when creating new ones. |
128 |
|
Resource Types |
list of strings |
No |
Comma-separated list of resource types. Must be surrounded by quotes in order to use commas, eg. “Flatbed, Diesel Truck” |
N/A |
How to use the importer
Admin Portal
- Log in to the admin portal
- Navigate to the Products/Services tab
- Click “Import”
- Click “Choose File” and select the desired file (must be in CSV format)
- You can also download the provided CSV template for an example of how the CSV file should be structured
- Click “Upload”
- To view the results of the sync, navigate to Organization > History or follow the “View Progress” link.
Tip: Ensure that the 'Rate' column does not include the dollar sign ($), as this will cause the import to fail. Also, make sure that each column contains the appropriate values.
How to manage New Clients in your Organization
Add all the companies you perform work for. You can first create the clients you perform work for most frequently and continue to add your resources. The rest of your clients can be added as you create jobs for them in the dispatch hub.
- Add new Client
Click on the plus sign (+) on the left side on the screen next to Hubs

b. Enter name and short code. you can click on "Short code suggestion" and the system will create one for you. You can also create your own as long as the code is under 16 characters.
c. Enter email address for Primary contact, please note that this email address will receive notifications regarding the status of all jobs created for this company
d. Add Billing address
e. Click Save.

How to manage Policies in your Organization
Policies allow you to configure the platform so specific forms can be automatically added to a job depending on the resource type selected on that job.
Important Note: To be able to create policies for your company, you are required to have forms saved into the platform first.
Add new policies
Visit the policies tab and click on New.

a. Select the Form from the dropdown
b. Select the Resource type(s) you would like to associate to that form
c. Click Save


How to manage Locations in your Organization
When creating locations, the owner should typically be the customer that will use that location. Only add your own locations when you truly own the location. E.g. your yards. Add midstream locations (SWD’s) as your customer since there is no way to add the actual midstream company yet.
Add new locations own by you
Visit the Locations tab and click on New.

a. Enter a Name
b. Enter Location type
c. Enter Status (Optional)
d. The Company will automatically default to the name of your company
e. Enter Description (Optional)
f. Adding Parent location and Geofence are also optional
g. Enter Coordinates - latitude and longitude (Optional). If coordinates are not entered the location will not be visible in map view.
h. Click Save.

Location Tags
Location Tags enables more flexible categorization and management of geographic locations.
Key Capabilities:
-
Tag Association with Counties or States
Tags can now be created and linked to specific counties or states. This allows for organized grouping of multiple locations under a common label. -
Rate Agreement Linking
Rate Agreements can be associated with Tags. This means that any Rate Agreement tied to a tag will automatically apply to all locations included in that tag, simplifying rate management across regions.
Example:
If you create a tag called Northern Region and associate it with several counties or states, you can link a Rate Agreement to that tag. The agreement will then apply to all locations within the Northern Region tag.
Training your Field Team
Now that your account is set up - these resources will help you onboard the rest of your team:
- For guidance on getting the app downloaded, permissions and offline capability
- For day to day, 'how to use this app' tips:
- Optionally, print out this 2 pager and they can take it with them as reminders:
How to create a job
a. Go to IronSight.app and use your credentials to login.
b. Click on the Schedule or Jobs tab to create a job.
c. Click on New job.
d. Select your clients’ hub or create a new customer, if not in dropdown.

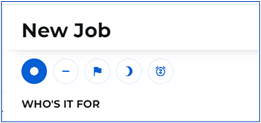
e. Select job’s tag:
- New (circle), unless a different tag is selected, the system will automatically default to it.
- Normal (line)
- High priority (flag)
- Deferred (moon)
- Filler (clock)
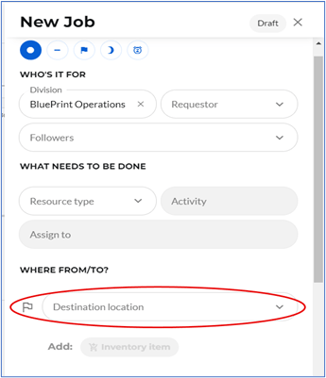
f. Add the job information:
- Requestor: person requesting the job.
- Followers: people who will receive notifications about the status of the job.
- Resource Type: trade needed to complete the job.
- Activity: what needs to be done.
- Assign to: unit the job is assigned to.
- Locations: sites where inventory needs to be picked-up and drop-off. If the location is not available in dropdown you can add it at that time.
How to add Locations
Important Note: Only admins can create locations. Coordinators can edit location status and description. Therefore, any SP coordinator that should be able to create new locations for jobs should be configured as admins.
We offer 2 different ways to add your client’s locations from Dispatch Hub. This means that after creating a location, you’ll only see it on field view if it has coordinates or in the location pickers. If it’s not visible on map view, you won’t be able to edit that location.
When creating locations, the owner should typically be the customer that will use that location. Only add your own locations when you truly own the location. E.g. your yards. Add midstream locations (SWD’s) as your customer since there is no way to add the actual midstream company yet.
Important Note: When a location is created from the new job option, the coordinates are optional; however, if the coordinates are not provided, the location will not be visible on filed view and not editable.
a. Click on the destination location and select add New Location
b. Enter name and location type
c. Enter latitude and longitude, description, parent, and status. (Optional)
The owner should typically be the customer that will use that location. Only add your own locations, when you truly own the location. E.g. your yards. Add midstream locations (SWD’s) as your customer since there is no way to add the actual midstream company yet.
d. Click Save.


- Inventory Item: type of item that will be transported.
- Quantity: amount.
- Date and Time: select start and end date and time when the job is required to be done.
*Use the Calendar button to create multiples of this job
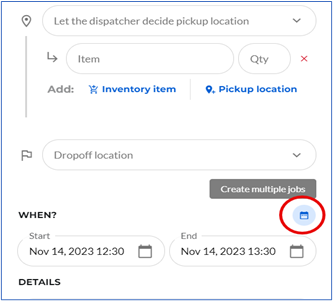
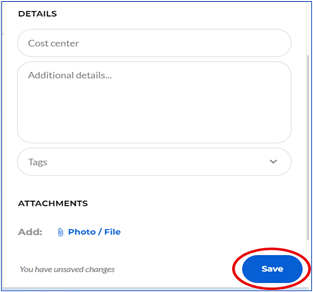
- Cost Center: related to locations for invoice purposes.
- Additional Details (Optional): this field can be used to provide additional information about the job.
- Tags (Optional): use tags to categorize jobs.
- Attachments: Photo/File (Optional): add documents or pictures to the job if needed.
- Click on Save.
Another way to add locations from Field View
- Right click on map or use the ‘new location’ button.
- Fill in the necessary information.
- Select the hub of the company you want to use the location for.


How to add Line Items/ Products and Services
a. Create/receive and schedule a job as usual.
b. At any time prior to the job approval status, open the job and scroll down to Line Items.
c. Click on Add.
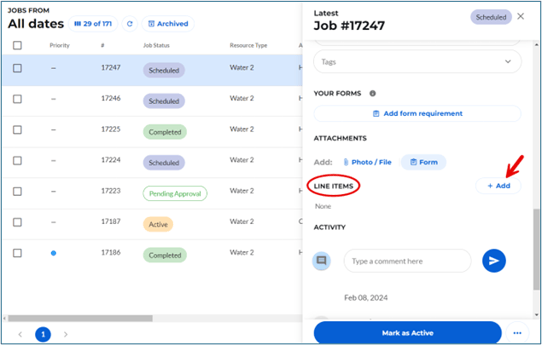
d. Select line item from the dropdown. If the line item you would like to add does not appear in dropdown (has not been created in the Admin Portal yet) type it and select ‘use X’ or add the item to your admin portal and refresh to access it from the job.
e. Enter quantity and the rate will automatically populate if a default rate was saved, otherwise add the rate.
- If you are entering this item for the first time, the rate needs to be entered.
f. Click on ‘Add line items’ until all your charges have been added.
g. Then Save.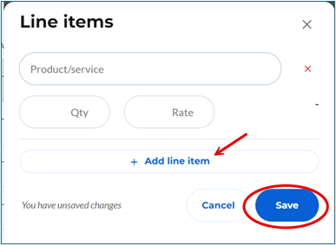
h. Submit for Approval. The job status will change to “Pending Approval.” & prompt your EP contact to review and approve the job.
i. After the customer has reviewed and approved the job, the job status will change to “Approved”. If the job has been rejected, comments will be added to the job explaining the reason. Find the job under the Rejected status, make the necessary updates and re-submit for approval.
- Important note: If you are not getting approvals and signoffs in IronSight from your client, simply add the line items and save, but do not ‘submit for approval’. The status will remain as “Completed.”
How to Batch Jobs
You can batch jobs from the job panel or the job list. Once you’ve created a batch, you can export costed jobs into a QuickBooks-friendly CSV format.
- To create a batch of jobs
a. Click on the "Jobs" tab.
b. Select the jobs you would like to batch by checking the box on the left-hand side of the job row. You can also use the filters to easily identify and group together the jobs that need to be batched, then click on the top box to select all.
c. Once the job selection is completed, click on the blue "Update Jobs" button.
d. Click on Add to Batch


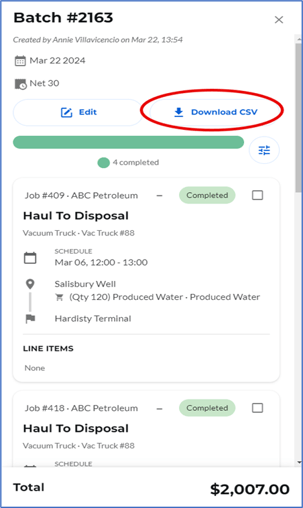
e. Create a new batch or select from an existing one to add jobs to that batch. If you are creating a new batch;
-
- Add batch number, date, payment terms and memo.
- Click on Create batch and add jobs button.

f. After reviewing the jobs, click on Download CSV and import to QuickBooks.
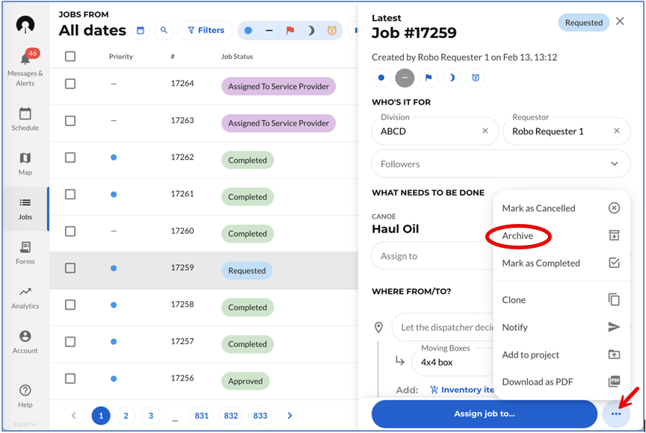
How to Archive Jobs
Archiving removes a job from the list of work that users can see, and these jobs no longer show up in mobile.
- To archive a job
a. Click on the job to open the job's side window.
b. Click on the 3 dots (...) at the bottom right-hand corner of the screen.
c. Click on Archive
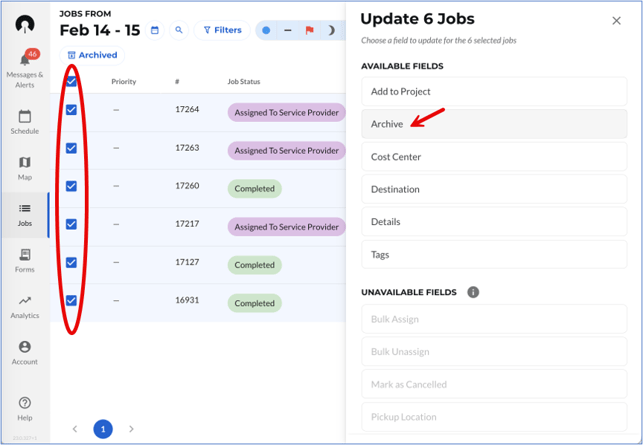
- To bulk-archive jobs
a. Click on the "Jobs" tab.
b. Select the jobs you would like to archive by checking the box on the left-hand side of the job row.
c. Once the job selection is completed, click on the blue "Update Jobs" button.
d. Click on Archive
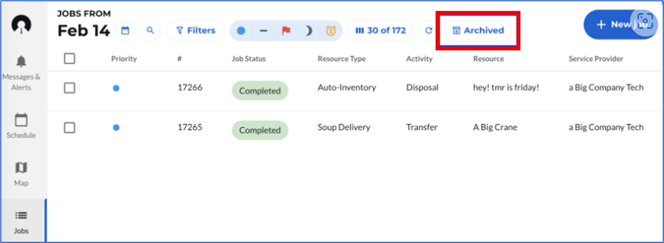
- To see archived jobs
a. Click on the "Jobs" tab
b. Click on "Archived"
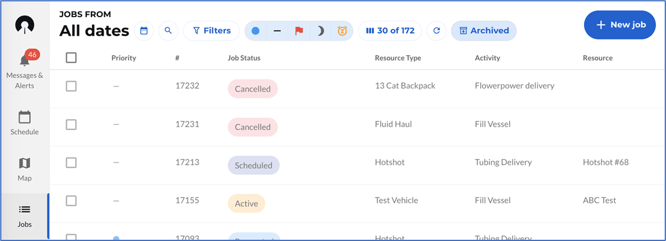
- To unarchive a job
a. Click on the "Jobs" tab
b. Click on "Archived"
c. Select the job you would like to unarchive, so the job side sheet opens
d. Click on "Unarchive"

