Table of Contents
To ensure compliance with Rule 8 Regulation mandated by the Texas Railroad Commission (RRC), all third-party disposal users will utilize IronSight for the review and approval of waste inventory received at their respective locations from energy producer companies.
Each disposal location will have designated Coordinators who are responsible for overseeing incoming jobs. These coordinators will be associated with specific locations and will have visibility into the job details assigned to those sites. For regulatory and operational tracking, users will have the ability to download an E-Manifest document, which contains key job and load information suitable for reporting and compliance documentation.
This guide will walk you through how to navigate the IronSight system, review incoming waste inventory, manage job approvals, and generate the necessary manifests efficiently and accurately.
How to navigate Dispatch Hub and Review jobs
Setting up your Account
How to navigate Dispatch Hub and Review jobs
Once a job is created in IronSight, designated coordinators for the location gain access to those jobs. After job completion, the coordinator must review each job and verify the reported waste type and quantity.
Before we step through the review workflow, let’s explore how to use IronSight’s filters to quickly locate the jobs you need.
Jobs Filters
a. Go to us.ironsight.app and use your credentials to login.
b. Click on Jobs tab to see jobs.
c. Click on the "Look for..." bar on the top of the page to see all available filters.
d. You can search for specific filters by typing in the “Look for…” box, or scroll to find filters manually. Many filters, such as Job Status, provide dropdown options. Combine multiple filters to refine your results as needed. For more details, refer to the help guide on Job filters.

e. The column organizer allows you to personalize your workspace in this tab. Select or deselect checkboxes to display specific columns, and adjust the column order by dragging and dropping columns using the six-dot icon on the far right.

Reviewing a job
a. Once the job has been completed and you are ready to review, you can use these Job filters to display the Jobs that need to be reviewed:
- Job Status: Completed
- The field "I certify" : Is No:

- The field "Waste disposal confirmed by":Is Empty
b. Once the filters are applied, all the Jobs that need to be reviewed will show up.
d. Click on a job to open.
The destination, type of waste and quantity of the job are on the top of the page; however, this information can change, so you need to verify it using the E-Manifest form.

e. Scroll down to find the information the driver has reported (). The Waste Classification is under the E-Manifest Part II

f. Then scroll back up, click on the Edit button in Details to complete the e-Manifest Part III. (Please note that only admin users are able to click "edit" here)

g. Confirm the Quantity Disposed.
Check the box ONLY if you need to report a discrepancy on the Type of Waste entered by the driver in e-Manifest Part II, then type your name and hit Save.


Setting up your Account
System Requirements
Desktops/Laptops:
We support Windows and Mac devices with a current version of Google Chrome or Edge with at least 8 GB of RAM.
Mobile Devices:
- Android - requires an operating system of 6.0 and up.
- iOS - requires an operating system of 14.0 or later.
Note: Even if your device meets these requirements, we have seen issues with some older device models. We recommend devices that are on current OS versions and are no older than 3 years.
Accessing IronSight
You will receive a welcome email from IronSight with a link to create your password after your user have been created in the system.
After creating your password, follow the link in the 'welcome' email to access IronSight's web app & log in.
To manage your users and locations, access the Admin Portal as below:
Click on Account and select Admin Portal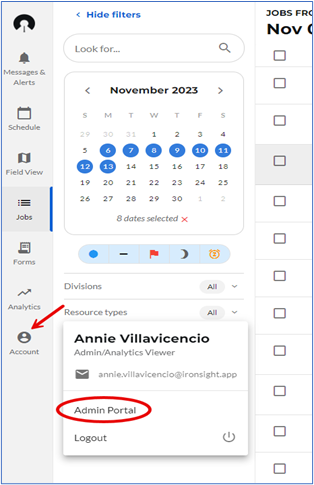
If preferred, you can access the admin portal from your phone at this link
How to manage Users in your Organization
Users in your organization are the coordinators responsible for reviewing and approving the jobs, please set up all your users as Admins and add an Attribute to ensure the association with the locations they are managing.
Add new users
Visit the Users tab and click on New.

a. Enter a Name
b. Enter an Email address. Important note: This email address will receive an email notification when setting up/updating their password.
c. Enter Phone number. Optional
d. Assign the Admin Role to the user, the first 3 toggles will turn on automatically.
e. Add the Attribute by clicking on Add, enter "Area" as the newKey and "Default+ a number" if you have different coordinators for locations. Then click on Save.
f. The user will receive a ‘Welcome to IronSight’ email that will have them set their password.

Update and archive users
IronSight also allows you to update information and/or remove the user's access to the platform when needed.
Visit the Users tab and click on the name of the user you would like to update or remove

Update the information and click Save, or Click on Archive and then Ok.


If the user needs to be "unarchived". Click on Archived, then click on the name of the user you would like to unarchive
 Review information and update if applicable, click unarchive.

How to manage Locations in your Organization
When creating a new location or updating an existing one, please make sure to add all required information and the corresponding "Tags": County, State, PermitNo and Area.
Add new locations
Visit the Locations tab and click on New.

a. Enter the location name.
b. Specify the location type.
c. Select the current status (optional).
d. Which hubs do you use this location with, this dropdown allows you to select the clients who will have visibility of this location.
e. Provide a description if needed (optional).
f. Input the geographic coordinates—latitude and longitude.
g. Add 4 required "tags":
- Tags categories will be:
- "County" and "State" where this location is located,
- "PermitNo" following the same format written above, capital P and N, no space between words, and
- "Area" this tag needs to match the Area Attribute you utilized when creating the user. These Area tags will allow you associate the locations with your coordinators. Example: if I added the Attribute Default2 to John Smith, I would add the tag Area: Default2 to all the locations he is responsible for reviewing and approving jobs.
h. Click "Save" to finalize the new location.
